Niagara
Informational Background
Programs
There are typically four different programs (or processes) associated with a Niagara system. These programs and their network communication are illustrated via the Communications Diagram:
- Station: is the Niagara runtime - a Java VM which runs a Niagara component application.
- Workbench: is the Niagara tool - a Java VM which hosts Niagara plugin components.
- Daemon: is a native daemon process. The daemon is used to boot stations and to manage platform configuration such as IP settings.
- Web Browser: is standard web browser such as IE or FireFox that hosts one of Niagara's web user interfaces.
Platforms
Niagara is hosted on a wide range of platforms from small embedded controllers to high end servers:
- Jace: the term Jace (Java Application Control Engine) is used to describe a variety of headless, embedded platforms. Typically a Jace runs on a Flash file system and provides battery backup. Jaces usually host a station and a daemon process, but not workbench. Jaces typically run QNX or embedded Windows XP as their operating system.
- Supervisor: the term Supervisor is applied to a station running on a workstation or server class machine. Supervisors are typically stations that provide support services to other stations within a system such as history or alarm concentration. Supervisors by definition run a station, and may potentially run the daemon or workbench.
- Client: most often clients running a desktop OS such as Windows or Linux access Niagara using the workbench or a web browser.
Daemon
The Niagara daemon is the one piece of Niagara written in native code, not Java. The daemon provides functionality used to commission and bootstrap a Niagara platform:
- Manages installing and backing up station databases;
- Manages launching and monitoring stations;
- Manages configuration of TCP/IP settings;
- Manages installation and upgrades of the operating system (QNX only);
- Manages installation and upgrades of the Java virtual machine;
- Manages installation and upgrades of the Niagara software;
- Manages installation of lexicons for localization; Manages installation of licenses;
On Windows platforms, the daemon is run in the background as a Window's service. On QNX it is run as a daemon process on startup.
The most common way to access daemon functionality is through the workbench. A connection to the daemon is established via the "Open Platform" command which opens a PlatformSession to the remote machine. A suite of views on the PlatformSession provides tools for accomplishing the tasks listed above.
Another mechanism used to access daemon functionality is via the plat.exe command line utility. This utility provides much of the functionality of the workbench tools, but via a command line program suitable for scripting. Run plat.exe in a console for more information.
Workbench
Niagara includes a powerful tool framework called the workbench. The workbench is built using the bajaui widget framework which is itself built using the standard Niagara component model.
The workbench architecture is designed to provide a common shell used to host plugins written by multiple vendors. The most common type of plugin is a view which is a viewer or editor for working with a specific type of object such as a component or file. Other plugins include sidebars and tools.
Workbench itself may be morphed into new applications using the BWbProfile API. Profiles allow developers to reuse the workbench infrastructure to create custom applications by adding or removing menu items, toolbar buttons, sidebars, and views.
- Obtain the station backup. It will likely come in two formats:
- .dist

- .zip

- If the file comes to you as a .dist format perform the following steps. If you have received it as a .zip format, skip to step 3.
-
Right click the file and rename the file
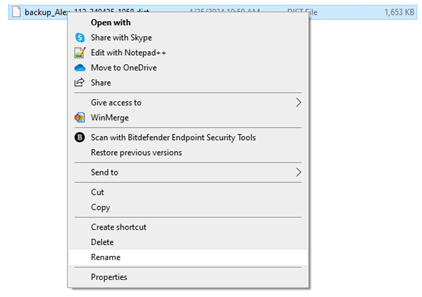
-
Rename file type from .dist to .zip and save the change

- Extract all the contents of the .zip into a regular windows folder.
- Once the contents are extracted, navigate inside the folder created using the below referenced structure:
-
Backup_Station name_Date and time created > niagara_user_home> stations> station name

-
This is your Niagara station. Inside it contains a .bog file and another folder called shared
- .bog -> The bog file contains a tree of components, their property configuration, and how they are wired together using links
- Shared -> This contains all the non-Niagara files contained inside the station. Some might be .Px files for the GUI, or Trend logs
- Open another Windows File Explorer.
- Navigate to the following location:
-
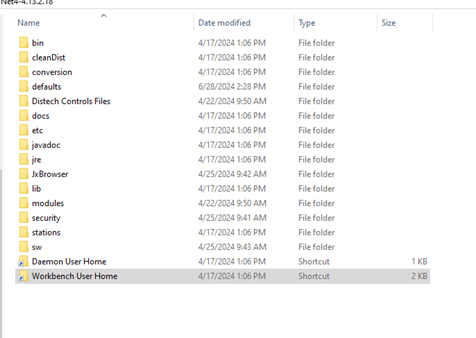
C:\Niagara\EC-Net4-4.13.2.18
- This is the primary folder that you will have access to all the files within this version of Niagara.
-
At the bottom of this list you will have the shortcut to “Workbench User Home”
-
Follow this link that will take you to the following location
- C:\Users\alex.dillenbeck\Niagara4.13\distech
-
You should now see a folder containing the following directories. This is your Workbench User Home.
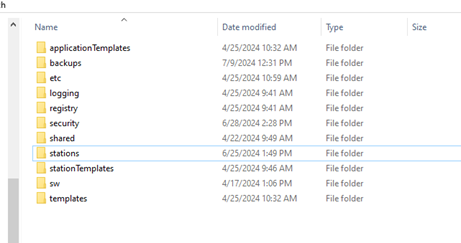
-
Go inside the “stations” folder.
-
This is the location of all the stations that currently reside on your local machine. From here you are freely available to move stations in and out of the Stations folder as needed.
- Copy the Niagara Station from the backup file and paste it into the stations directory of your Workbench User Home.
- This will now allow you to see the Niagara Station through the EC-Net software.
- Run your platform daemon of the correct version of station backup you have. There are one of two methods.
- Method 1:
- Utilize AX switcher to select the correct version of software you’d like to run.
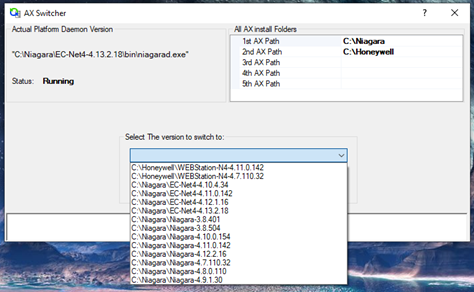
- Once you have selected the appropriate software version to run, the AX Switcher software will start your daemon and launch the selected version of Niagara.
- Utilize AX switcher to select the correct version of software you’d like to run.
- Method 2
-
Navigate to the below file path:
C:\Niagara\EC-Net4-4.13.2.18\bin
-
In that folder you will find an application named “plat.exe,” Run this application and it will install and run the platform daemon for you to locally run a station on your machine.
-
Secondly, within the same directory folder, launch the application “wb.exe,” this will launch the EC-Net software.
-
- Once the software has opened up, you will now open a platform connection under the “My Host:” object in your Nav tree.
- Right click “My Host”
- Select “Open Platform”
- You should then be prompted with this window:
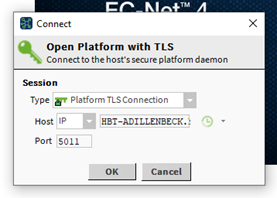
- d. Select OK
- Login credentials will be requested.
- The username and password are the same information used from an admin account on the machine you are using.
- If you are using your HBT provided machine it will be your user account and password used to login. If you do not know your exact user account name, you can find this under the users folder in your C: drive.
- If you are using a hoffman account on an external server the credentials should be as follows:
- Username: hoffman
- Password: rep4
- Inside the platform, go to Station Copier.
- The left column contains all the Stations in your Workbench User Home. The column on the right are all the stations in your Daemon User Home.
- In this process we will be moving the station from the Workbench (left) to the Daemon (right).
- Select the desired station you would like to move to your Platform Daemon.
- Copy the folder to the right.
- Follow through all the prompts, the only change to make is uncheck the “Auto-Start” selection.
- Navigate to the Application Director under the platform.
- Select the station that you would like to run.
- Click the “Start” button on the right.

- This will start all the processes for the station to run locally on the machine.
- You can then double click the station and login with the following credentials.
- Username: hoffman
- Password: Rep4
Revision History
| Revision | Date | Name | Description |
|---|---|---|---|
| 1.0.0 | 12/6/2024 | Alex Dillenbeck | Initial Implementation |